AWS Jenkins AMI User Guide

Managing your CI/CD pipelines just got easier with the Prezelfy Jenkins AMI. Built on Amazon Linux 2023 and hardened according to CIS (Center for Internet Security) benchmarks, this pre-configured Amazon Machine Image takes the headache out of setting up Jenkins. Forget spending hours on installation and configuration—this AMI is ready to go, so you can focus on writing code and delivering great software. With seamless integration into AWS services and security best practices already in place, the Prezelfy Jenkins AMI gives you everything you need for a reliable and secure Jenkins environment. Whether you’re just starting out or fine-tuning an existing pipeline, this AMI makes it easier to keep your projects running smoothly in the cloud.
What do we offer with our Jenkins AMI?
1. Security Best Practices
Our AWS jenkins AMI is configured with security best practices in mind. As minimum AMI includes recommended settings and configurations required by AWS, reducing the risk of overlooking crucial security measures. The operating system settings are hardened by CIS rules to reduce the attack surface, and unnecessary services or ports are disabled to minimize potential entry points for malicious actors. Our approach significantly reduces the likelihood of overlooking critical security configurations that might be missed when setting up a Jenkins Host manually. Moreover, our jenkins AMIs incorporate the latest security updates and patches, providing a solid foundation that aligns with current security standards (CIS).
2. Time and Effort Savings
Setting up Jenkins from scratch can be time-consuming and frustrating, especially when dealing with configurations, dependencies, and troubleshooting. The Prezelfy AMI removes that headache completely. It’s a fully pre-configured environment that’s ready to use as soon as you launch it. You don’t have to waste hours or even days tweaking settings or fixing issues—you can start focusing on building and deploying your applications right away. It’s designed to save you time and effort, letting you get back to what really matters: delivering value to your users.
3. Consistency Across Environment
One of the biggest challenges in managing Jenkins is ensuring that your development, staging, and production environments are consistent. With the Prezelfy AMI, you can deploy the exact same Jenkins setup across all your environments, ensuring there are no surprises or inconsistencies. This consistency helps minimize errors, simplifies troubleshooting, and creates a more predictable CI/CD pipeline. Whether you’re a solo developer or managing a large team, having the same reliable setup everywhere makes life so much easier.
4. Version Control and Updates
Keeping Jenkins and its plugins up to date can feel like a never-ending task. With Prezelfy, you don’t have to worry about manually checking for updates or patching vulnerabilities. We’ve taken care of it for you, ensuring that the AMI is always running the latest, most secure version of Jenkins and its dependencies. This not only keeps your environment secure but also ensures compatibility with new features and AWS services. You can trust that your Jenkins environment is current and optimized without lifting a finger.
5. Pre-Installed Plugins
Plugins are what make Jenkins so powerful, but figuring out which ones you need and setting them up can be overwhelming. With the Prezelfy AMI, we’ve done the heavy lifting for you. We’ve pre-installed and configured a selection of popular, battle-tested plugins that most teams rely on. Whether it’s for source control, notifications, or pipeline management, these plugins are ready to go so you can hit the ground running.
6. Pipeline Samples
Starting from scratch with Jenkins pipelines can be daunting, especially if you’re new to CI/CD. That’s why the Prezelfy AMI includes sample pipelines to help you get started. These examples are designed to be easy to understand and adapt to your specific needs. Whether you’re building a simple project or a complex workflow, these templates can save you hours of trial and error, giving you a solid foundation to build on. It’s like having a head start for your automation goals. List of sample pipelines:
- - Docker Build and Push Pipeline (docker-build-pipeline): Builds a Docker image, runs tests inside it, and pushes the image to a registry
- - Continuous Deployment Pipeline (continuous-deployment-pipeline): Automates build, testing, deployment, and post-deployment validation of an application
- - Multi-Branch Pipeline (multi-branch-pipeline): Executes branch-specific build and test workflows for multi-branch repositories
- - Static Code Analysis Pipeline (static-code-analysis-pipeline): Analyzes code for quality and generates a report without deploying the application
- - Artifact Build and Archive Pipeline (artifact-build-pipeline): Builds the application, tests it, and archives the artifacts for later use
- - Parallel Testing Pipeline (parallel-testing-pipeline): Runs multiple test stages concurrently, including integration tests, to speed up feedback
- - Notification on Build Status Pipeline (notification-pipeline): Builds the application, tests it, and sends notifications about the build status
- - Infrastructure as Code Pipeline (iac-pipeline): Provisions and validates infrastructure using Terraform with automated steps
7. Documentation
Ever spent hours trying to figure out how to configure something, only to find outdated or confusing documentation? Prezelfy AMIs come with clear, thorough documentation that’s written with developers in mind. Whether you’re a beginner or an experienced user, you’ll have access to everything you need to get started quickly, troubleshoot issues, and make the most of your Jenkins setup. From setup guides to pipeline tips, we’ve got you covered.
Architectural design
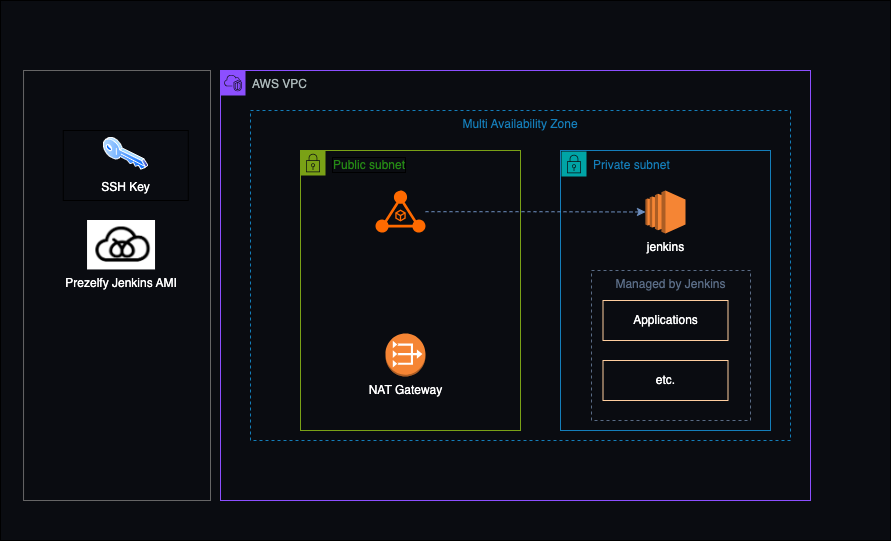
The diagram showcases a sample architecture for deploying the Prezelfy Jenkins AMI within an AWS environment, designed to demonstrate a secure, efficient, and reliable setup for CI/CD pipelines. Operating within an AWS VPC with a multi-availability zone design, this example highlights high availability and fault tolerance. The public subnet hosts a NAT Gateway for managing outbound internet access, while the private subnet securely runs Jenkins, powered by the Prezelfy AMI, without direct internet exposure. This architecture supports the management of applications and workflows under Jenkins, with secure access provided via SSH keys generated during installation process. Please note: this is a sample architecture for reference purposes only. Everyone should follow their organization’s specific guidelines, security policies, and best practices when deploying Jenkins in production environments.
Installation guide
- Generate key pair and save private key on secure placeFollow the steps: Create and Manage Key Pairs - AWS EC2 Documentation
- Launch Prezelfy Jenkins AMIFollow the steps:
- Go to AWS Marketplace and search for Prezelfy Jenkins AMI
- Subscribe to the AMI by, click on the Prezelfy Jenkins AMI listing, review the pricing and terms of service and click the “Continue to Subscribe” button and confirm your subscription
- Configure Your AMI in EC2, by go to your AWS Management Console and navigate to EC2 and click Launch Instance and choose Prezelfy Jenkins AMI from your subscribed AMIs
- Set Instance Details, by choosing your instance type, configure networking, like adding the instance to an existing VPC and selecting subnets, add or select a security group to control access to your Jenkins server, allow port 8080 for Jenkins and port 22 for SSH access
- Launch Your Instance, by review your settings and click Launch and select an SSH key pair created in step 1
- Access Jenkins, by open a web browser and navigate to http://your-instance-IP:8080
- Unlock JenkinsFollow the steps.
In your terminal type:
- SSH into EC2 instance:username:
ec2-user
password: use SSH-key used during EC2 instance creation
Example:
ssh -i /Users/Keys/jenkins.pem ec2-user@prezelfy-jenkins.com
- Copy initial admin password and paste it under http://your-instance-IP:8080 URL in your browser
cat /var/lib/jenkins/secrets/initialAdminPassword
- Review existing pipelinesUnder http://your-instance-IP:8080 review sample pipelines provided by Prezelfy
Troubleshooting when Jenkins is not working
This are some of the cations we recommended to take when jenkins server is not functioning as intended:
1. Check Network Connectivity
Ensure that security group associated with Jenkins allows inbound traffic on port 8080 (as default port) from your IP address and verify that there are no network ACLs or route table rules blocking the traffic.
2. Verify Jenkins Instance Status
Check the status of the Jenkins host instance. If it's terminated, you may need to relaunch it.
3. Inspect Security Group Rules
Confirm that the security group associated with the Jenkins allows outbound traffic to the target instances, ensure that the security group rules for the target instances allow inbound SSH traffic from the jenkins host.
4. SSH Key Pair and Permissions
Verify that you are using the correct SSH key pair to connect to the Jenkins host and check the permissions on the private key file (it should only be readable by the owner).
5. EC2 Instance Metadata
On the Jenkins host, check the EC2 instance metadata for errors or issues. Access metadata at http://169.254.169.254/latest/meta-data/ on the jenkins host.
6. IAM Role Trust Relationships
Review the trust relationship policy attached to the IAM role in the target account, Ensure that it allows the Jenkins account to assume the role and check if the IAM role in the target account is still valid and has not been modified.